Table of Contents [expand]
- Configuring a Connection
- Pause a Connection
- Resume a Connection
- Change the API Version
- Recreating a Connection After a Sandbox Refresh
- Select the Write Algorithm For Your Connection
- Recover Synchronization After an Error
- Recover Synchronization After a Database Rollback
- Changing Field Definitions in Salesforce
- Connection Configuration Audit Trail
Last updated July 31, 2026
Each Heroku Connect add-on is configured to connect to a single Heroku Postgres database and a single Salesforce org. This article covers how to manage your sync and connections.
Heroku Connect doesn’t provide a mechanism for partially syncing data. A mapping always syncs all records. See Unsupported Objects for exceptions involving archived Tasks and Events.
Configuring a Connection
See the Quick Start: Heroku Connect to configure your connection.
Pause a Connection
When performing certain tasks, such as upgrading your database, you can pause synchronization activity in Heroku Connect.
To pause synchronization:
- Open the Heroku Connect dashboard.
- Select the
Settingstab. - Select
Manage Connection. - Select the
Pausebutton.
Heroku Connect completes any pending operations before entering the paused state. When paused, changes to data in the database are still added to the trigger log. There’s no polling for changes made in Salesforce. Push Topic notifications from Salesforce for mappings using the streaming mode are also ignored.
Connections can only be paused when they are in the IDLE state. If your connection remains in the POLLING_DB_CHANGES status for an extended time, check your logs to debug.
Resume a Connection
Any changes made to data in the Heroku Postgres database or in Salesforce while it was paused automatically syncs upon resuming the connection.
To resume synchronization:
- Open the Heroku Connect dashboard.
- Select the
Settingstab. - Select
Manage Connection. - Select
Resume.
Heroku Connect continues where it left off by processing trigger log entries to push changes to Salesforce. It also retrieves changes made in Salesforce using polling, including mappings that normally use the Streaming API or Change Data Capture (CDC).
Change the API Version
You can change the Salesforce API version after configuring the connection from the Heroku Connect dashboard or with the Heroku Connect CLI.
Dashboard
From the Heroku Connect dashboard:
-
On the
Settingstab, selectManage Salesforce. -
Next to the
API Version, selectManage Version. -
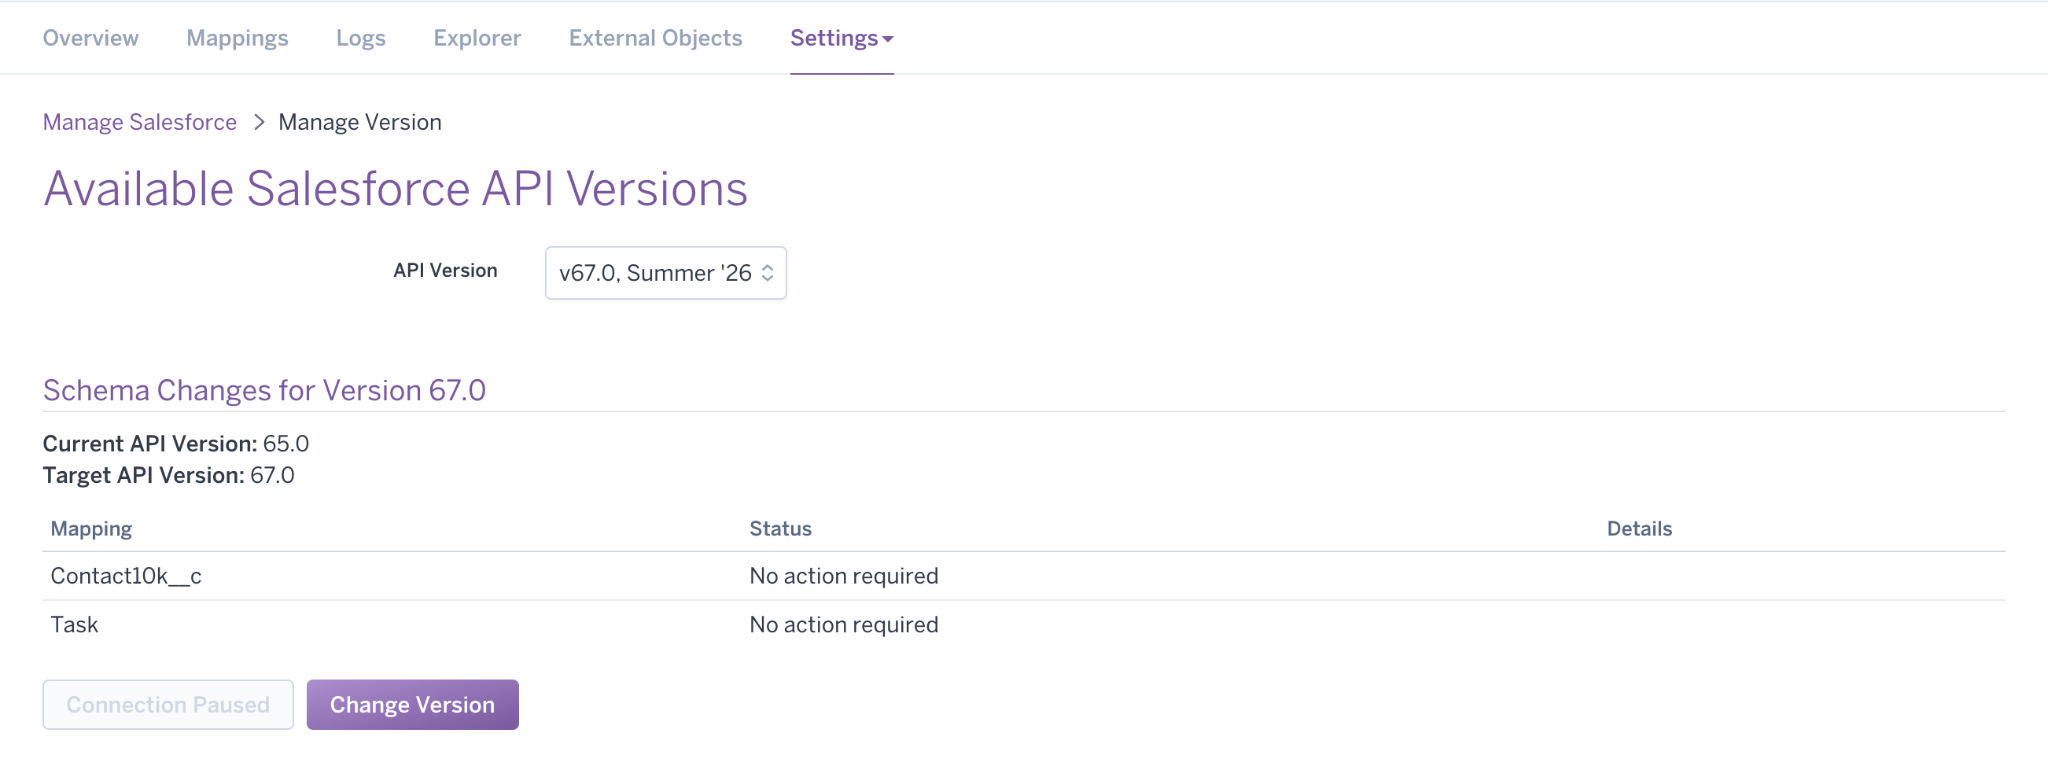
Select the Salesforce API version to change to in the
API Versiondropdown.Selecting a version shows a comparison of the schema on your current API version and your target API version. The table shows if there are any changes required to your schema before you can change the version. Schema issues include:
- The length of a field increased in Salesforce in the target version. Heroku Connect automatically updates your database schema.
- The definition of a field changed in Salesforce in the target version, and Heroku Connect can’t update your database automatically. In this case, un-map the field and save the mapping before changing the version. Then re-map the field after successfully changing the version.
- A field was removed in Salesforce in the target version. You must edit the mapping to remove it from Heroku Connect.
-
If there are no schema conflicts, click
Pause Connectionto pause the connection. If there are any mappings actively syncing, you must wait for them to finish syncing before changing the version. -
Click
Change Version.
- Resume the connection after changing the API version by clicking
Resume Connection.

CLI
From the CLI, run heroku connect:manage-sf-api-version with the target version to change versions to. If your app has multiple connections, provide the name of the Heroku Connect connection to change as well:
$ heroku connect:manage-sf-api-version --app example-app --resource herokuconnect-resource-name --target-version 67.0
Comparing schemas... done
=== Connection: example-app:full
Current API Version: 32.0
Target API Version:  67.0
Mapping         Status              Details
──────────────  ─────────────────── ────────────────────────────────
Task            No action required  Length increased in Salesforce for field: priority. Heroku Connect alters your database table to match the Salesforce definition when the mapping is saved.
Contact10k__c   No action required
Opportunity     No action required
Profile         No action required
To change example-app:full to Salesforce API 67.0, re-run this command with --confirm example-app.
You must pause the connection and wait for all the mappings to complete syncing before changing the version. Make sure that your connection is in the PAUSED state.
Pass the --confirm flag with the name of your app to confirm the version upgrade:
$ heroku connect:manage-sf-api-version --app example-app --resource herokuconnect-resource-name --target-version 67.0 --confirm example-app

Changing example-app:full to API 67.0... done
=== Connection: example-app:full
Current API Version: 32.0
Target API Version:  67.0
Mapping        Status              Details
─────────────  ──────────────────  ────────────────────────────────────────────────────────────────────────────────────────────────────────────────────────────────────────────────────────────
Task           No action required  Length increased in Salesforce for field: priority. Heroku Connect alters your database table to match the Salesforce definition when the mapping is saved.
Contact10k__c  No action required
Opportunity    No action required
Profile        No action required
Successfully changed version on example-app:full to Salesforce API 67.0. Run heroku connect:resume to resume sync.
Then, resume the connection after successfully changing the API version.
Recreating a Connection After a Sandbox Refresh
If you reloaded a sandbox organization, you must delete your existing connection and recreate it. You must manually configure these settings in the sandbox org:
- Collaborators and their notifications settings
- Beta features
- The Write Algorithm
- The Salesforce API version
To automate the rest of the recreation, follow these instructions for the Heroku CLI or the Heroku Connect Dashboard.
CLI
From the Heroku CLI:
-
Export your Heroku Connect configuration with:
$ heroku connect:export -a appname herokuconnect-resource-name -
If you have any read or write mappings, make sure you aren’t writing any new data to those tables. Also, make sure all the mappings are in
DATA_SYNCEDto ensure all your data is present in Salesforce. To stop activity on the connection, run:$ heroku connect:pause -a appname herokuconnect-resource-name -
Destroy the Heroku Connect add-on with:
$ heroku addons:destroy -a appname herokuconnect-resource-name -
Create a new Heroku Connect add-on with:
$ heroku addons:create herokuconnect -
Authenticate your add-on with the following command and login with your Salesforce credentials:
$ heroku connect:sf:auth -a appname herokuconnect-resource-name -
Import the mapping configuration you exported from step one with:
$ heroku connect:export mapping_file.json -a appname herokuconnect-resource-name
Dashboard
From the Heroku Connect Dashboard:
-
Export your Heroku Connect configuration from the
Settingstab.a. Select
Import/Export Configuration, thenExport, andExportagain in the confirmation window to download the JSON file. -
If you have any read or write mappings, make sure you aren’t writing any new data to those tables. Also, make sure all the mappings are in
DATA_SYNCEDto ensure all your data is present in Salesforce. From theSettingstab, clickManage Connection, and thenPauseto stop activity on the connection. -
Destroy the Heroku Connect add-on from the
Resourcestab on Heroku Dashboard. Select the actions button (three vertically-stacked dots) on the add-on’s to open the menu. Then selectDelete Add-on. -
Create a new Heroku Connect add-on from the
Resourcestab on Heroku Dashboard. Search for and add theHeroku Connectadd-on. -
Authenticate your add-on by opening the Heroku Connect Dashboard and select
Setup Connection.a. Select the Heroku Postgres database and schema to connect to your add-on, and click
Next.b. Select the Salesforce org type and API version for your connection and select
Authorizeto log in with your Salesforce credentials. -
Import the mapping configuration you exported from step one from the
Settingstab.a. Select
Import/Export Configuration, thenImport.b. Select
Choose Fileand select the file to upload, and then selectUpload.
Select the Write Algorithm For Your Connection
Select the algorithm Heroku Connect uses when writing data to Salesforce. The same algorithm is used for all read-write mappings. See Write Algorithms for more info.
- Open the Heroku Connect dashboard.
- Select the
Settingstab. - Select
Manage Connection. - Scroll down to the Write Algorithm section and select your choice.
Recover Synchronization After an Error
- Open the Heroku Connect dashboard.
- Select the
Settingstab. - Select
Manage Connection. - Select
Recover From Errorto clear out an unexpected error state and resume synchronization. See Heroku Connect Log Messages and Common Errors for more info.
Recover Synchronization After a Database Rollback
Heroku Connect uses a high-water mark methodology. Rolling back a synced Heroku Postgres database causes inconsistent data. Reload mappings after a database rollback to recover data consistency.
Changing Field Definitions in Salesforce
Heroku Connect doesn’t automatically change the table schema in PostgreSQL after you’ve changed the corresponding field definition in Salesforce. Attempts to automatically change the field can result in data loss or corruption. See Changing Field Definitions in Salesforce for more info.
Connection Configuration Audit Trail
Heroku Connect keeps a record of administrative changes to your connection’s configuration. Click Download Audit Trail to export to CSV. See Audit Messages for more info.