Table of Contents [expand]
Last updated January 27, 2026
Web applications that process concurrent requests make more efficient use of dyno resources than those that only process one request at a time. Puma is a web server that allows you to handle concurrent requests.
Puma uses threads, in addition to worker processes, to make more use of available CPU. You can only utilize threads in Puma if your entire code-base is thread safe. Otherwise, you can still use Puma, but must only scale-out through worker processes.
This guide will walk you through deploying a new Rails application to Heroku using the Puma web server. For basic Rails setup, see Getting Started with Rails.
Always test your new deployments in a staging environment before you deploy to your production environment.
Adding Puma to your application
Gemfile
First, add Puma to your app’s Gemfile:
gem 'puma'
Procfile
Set Puma as the server for your web process in the Procfile of your application. You can set most values inline:
web: bundle exec puma -t 3:3 -p ${PORT:-3000} -e ${RACK_ENV:-development}
However, we recommend generating a config file:
web: bundle exec puma -C config/puma.rb
Make sure the Procfile is appropriately capitalized and checked into git.
Puma Version
Heroku strongly recommends Puma 7+ for compatibility with keepalive requests with the Common Runtime Router.
Config
Create a configuration file for Puma at config/puma.rb or at a path of your choosing. For a simple Rails application, we recommend the following basic configuration:
# Thread per process count allows context switching on IO-bound tasks for better CPU utilization.
threads_count = ENV.fetch('RAILS_MAX_THREADS') { 3 }
threads(threads_count, threads_count)

# Processes count, allows better CPU utilization when executing Ruby code.
# Recommended to always run in at least one process so `rack-timeout` RACK_TERM_ON_TIMEOUT=1 can be used
# https://devcenter.heroku.com/articles/h12-request-timeout-in-ruby-mri
workers(ENV.fetch('WEB_CONCURRENCY') { 2 })

# Support IPv6 by binding to host `::` in production instead of `0.0.0.0` and `::1` instead of `127.0.0.1` in development.
host = ENV.fetch("RAILS_ENV") { "development" } == "production" ? "::" : "::1"

# PORT environment variable is set by Heroku in production.
port(ENV.fetch("PORT") { 3000 }, host)

# Allow Puma to be restarted by the `rails restart` command locally.
plugin(:tmp_restart)

# Heroku strongly recommends upgrading to Puma 7+. If you cannot upgrade,
# Please see the Puma 6 and prior configuration section below.
#
# Puma 7+ already supports PUMA_PERSISTENT_TIMEOUT natively. Older Puma versions set:
#
# ```
# persistent_timeout(ENV.fetch("PUMA_PERSISTENT_TIMEOUT") { 95 }.to_i)
# ```
#
# Puma 7+ fixes a keepalive issue that affects long tail response time with Router 2.0.
# Older Puma versions set:
#
# ```
# enable_keep_alives(false) if respond_to?(:enable_keep_alives)
# ```
You must also ensure that your Rails application has enough database connections available in the pool for all threads and workers. (This will be covered later).
Workers
# Processes count, allows better CPU utilization when executing Ruby code.
workers(ENV.fetch('WEB_CONCURRENCY') { 2 })
To manually configure this value, use
heroku config:set WEB_CONCURRENCY. Load test your application to find the right value for your app.
Puma forks multiple OS processes within each dyno to allow a Rails app to support multiple concurrent requests. In Puma terminology, these are referred to as worker processes (not to be confused with Heroku worker processes, which run in their dynos). Worker processes are isolated from one another at the OS level, therefore not needing to be thread-safe.
Multi-process mode does not work if you are using JRuby or Windows because the JVM and Windows do not support processes. Omit this line from your config if you are using JRuby or Windows.
Each worker process used consumes additional memory. This behavior limits how many processes you can run in a single dyno. With a typical Rails memory footprint, you can expect to run 2-4 Puma worker processes on an eco, basic, or standard-1x dyno. Your application may allow for more or less, depending on your specific memory footprint. We recommend specifying this number in a config var to allow for faster application tuning. Monitor your application logs for R14 errors (memory quota exceeded) via one of our logging addons or Heroku logs.
Threads
# Thread per process count allows context switching on IO-bound tasks for better CPU utilization.
threads_count = ENV.fetch('RAILS_MAX_THREADS') { 3 }
threads(threads_count, threads_count)
Puma can serve each request in a thread from an internal thread pool. This behavior allows Puma to provide additional concurrency for your web application. Loosely speaking, workers consume more RAM and threads consume more CPU, and both offer more concurrency.
On MRI, there is a Global lock called the GIL or GVL that ensures only one thread can run at any time. IO operations such as database calls, interacting with the file system, or making external HTTP calls will not lock the GIL. Most Rails applications heavily use IO, so adding additional threads will allow Puma to process multiple threads, gaining you more throughput. JRuby and Rubinius also benefit from using Puma. These Ruby implementations do not have a GIL and will run all threads in parallel regardless of what is happening in them.
Puma allows you to configure your thread pool with a min and max setting, controlling the number of threads each Puma instance uses. The min threads setting allows your application to spin down resources when not under load. This feature is not needed on Heroku, as your application can consume all of the resources on a given dyno. We recommend setting min to equal max.
Each Puma worker will be able to spawn up to the maximum number of threads you specify.
Port
# Support IPv6 by binding to host `::` in production instead of `0.0.0.0` and `::1` instead of `127.0.0.1` in development.
host = ENV.fetch("RAILS_ENV") { "development" } == "production" ? "::" : "::1"

# PORT environment variable is set by Heroku in production.
port(ENV.fetch("PORT") { 3000 }, host)
Heroku will set ENV['PORT'] when the web process boots up. Locally, default this to 3000 to match the Rails default. The host will use "::", which is the IPv6 equivalent of 0.0.0.0.
When running locally, it’s important not to expose your development environment to the open internet, as detailed error messages and stack traces not normally visible to end users in production will be visible. In a non-production environment, the host will use::1, which is the IPv6 equivalent of 127.0.0.1.
Timeout
There is no request timeout mechanism inside of Puma. The Heroku router will timeout all requests that exceed 30 seconds. Although an error will be returned to the client, Puma will continue to work on the request as there is no way for the router to notify Puma that the request terminated early. To avoid clogging your processing ability, we recommend using Rack::Timeout to terminate long-running requests and locate their source.
Add the Rack Timeout gem to your project.
# Gemfile
gem "rack-timeout"
Note: This environment variable support requires rack-timeout 0.5.0+. The RACK_TIMEOUT_TERM_ON_TIMEOUT setting requires rack-timeout 0.6.0+.
If you use RACK_TIMEOUT_TERM_ON_TIMEOUT=1 without a forking web server (without Puma workers), then a timeout will terminate your whole web server rather than restarting a single process.
Then you can configure behavior via environment variables. If you’re using workers (processes), we recommend turning on “term on timeout,” which will restart processes, which is safer than killing threads:
$ heroku config:set RACK_TIMEOUT_TERM_ON_TIMEOUT=1
To understand the various rack-timeout settings, you can see how they behave with a set of interactive rack-timeout demos. For additional suggestions on reducing or debugging timeouts on Heroku see H12 - Request Timeout in Ruby (MRI).
Keepalive
# Heroku strongly recommends upgrading to Puma 7+. If you cannot upgrade,
# please see the Puma 6 and prior configuration section below.
#
# Puma 7+ already supports PUMA_PERSISTENT_TIMEOUT natively. Older Puma versions set:
#
# ```
# persistent_timeout(ENV.fetch("PUMA_PERSISTENT_TIMEOUT") { 95 }.to_i)
# ```
#
# Puma 7+ fixes a keepalive issue that affects long tail response time with Router 2.0.
# Older Puma versions set:
#
# ```
# enable_keep_alives(false) if respond_to?(:enable_keep_alives)
# ```
When using Heroku router 2.0, requests passed to the dyno may use the HTTP/1.1 feature “keepalive.” A bug documented in Puma was fixed in Puma 7+. This puma bug allows such a request to monopolize a web thread, resulting in worse long tail response times. Users of older Puma versions are suggested to turn off keepalive requests in the Puma config or at the router labs level.
By default, the Ruby buildpack will set PUMA_PERSISTENT_TIMEOUT, which is configured to be the persistent keepalive timeout value of the router plus a few seconds, so that the server does not close a connection while the router is trying to deliver a new response.
Preload app
Older versions of Puma did not turn on application preloading by default:
# Not required on newer Puma versions
# ```
# preload_app!
# ```
Preloading your application reduces the startup time of individual Puma worker processes and allows you to manage each worker’s external connections using the on_worker_boot calls. In the config above, these calls are used to establish Postgres connections for each worker process correctly.
Environment
Older versions of Puma did not default to using the correct RAILS_ENV or RACK_ENV environment variables:
# Not required on newer Puma versions
# ```
# run_env = ENV["RAILS_ENV"] || ENV["RACK_ENV"] || "development"
# environment(run_env)
# ```
On Heroku, ENV['RACK_ENV'] will be set to 'production' by default
Rackup
# Not required on newer Puma versions
# ```
# rackup(DefaultRackup)
# ```
Older versions of Puma did not default to a rackup file and required this line. You can use the rackup command to tell Puma how to start your rack app. The above configuration should point at your application’s config.ru, which is automatically generated by Rails when you create a new project.
On worker boot
Using ActiveRecord::Base.establish_connection is no longer needed for Rails 5.2+ apps as forked connections will automatically re-connect.
Puma 7+ renamed on_worker_boot to before_worker_boot.
The before_worker_boot block runs after a worker spawns, but before it begins to accept requests. This block is especially useful for connecting to different services, as connections cannot be shared between multiple processes. This behavior is similar to Unicorn’s after_fork block. It is only needed if you are using multi-process mode (i.e. have specified workers).
If you are using Rails 4.1+ you can use the database.yml to set your connection pool size, and this is all you need to do:
# For apps using the `config/database.yml` method of setting `pool` size
# Worker-specific setup for Rails 4.1 to 5.2, after 5.2 it's not needed.
#
# ```
# defined?(before_worker_boot) ? before_worker_boot : on_worker_boot do
#   ActiveRecord::Base.establish_connection
# end
# ```
Otherwise, you must be very specific with the reconnection code:
# Valid on Rails up to 4.1, the initializer method of setting `pool` size
#
# ```
# defined?(before_worker_boot) ? before_worker_boot : on_worker_boot do
#   ActiveSupport.on_load(:active_record) do
#     config = ActiveRecord::Base.configurations[Rails.env] ||
#              Rails.application.config.database_configuration[Rails.env]
#     config['pool'] = ENV['RAILS_MAX_THREADS'] || 5
#     ActiveRecord::Base.establish_connection(config)
#    end
# end
# ```
If you are already using an initializer, you should switch over to the
database.ymlmethod as soon as possible. Using an initializer requires duplicating code if when using hybrid mode in Puma. The initializer method can cause confusion over what is happening and is the source of numerous support tickets.
In the default configuration, we are setting the database pool size. For more information, please read Concurrency and Database Connections in Ruby with ActiveRecord. We also make sure to create a new connection to the database here.
If you get connection errors while booting up your application, consult the gem documentation for the service you are attempting to communicate with to see how you can reconnect in this block.
Slow clients
A slow client is one that sends and receives data slowly. For example, an app that receives images uploaded by users from mobile phones that are not on WiFi, 4G, or other fast networks. This type of connection can cause a denial of service for some servers, such as Unicorn, as workers must sit idle as they wait for the request to finish. To protect your application, either move to a server with built-in slow client protection, such as Puma, or run behind a proxy server, such as NGINX, that handles slow clients. The Unicorn web server must run behind NGINX, or it is vulnerable to slow client attacks.
Puma can allow multiple slow clients to connect without requiring a worker to be blocked on the request transaction. Because of this, Puma handles slow clients gracefully. Heroku recommends Puma for use in scenarios where you expect slow clients.
For more details on how Puma mitigates slow clients, read Puma 4: New I/O 4 Your Server
Database connections
As you add more concurrency to your application, it will need more connections to your database. A good formula for determining the number of connections each application will require is to multiply the RAILS_MAX_THREADS by the WEB_CONCURRENCY. This combination will determine the number of connections each dyno will consume.
Rails maintains its database connection pool, with a new pool created for each worker process. Threads within a worker will operate on the same pool. Make sure there are enough connections inside your Rails database connection pool so that the RAILS_MAX_THREADS number of connections can be used. If you see this error:
ActiveRecord::ConnectionTimeoutError - could not obtain a database connection within 5 seconds
This error indicates that your Rails connection pool is too low. For an in-depth look at these topics, please read the Dev Center article Concurrency and Database Connections.
Backlog
It is possible to set a “backlog” value for Puma. This setting is the number of requests that will be queued at the socket before Puma begins rejecting HTTP requests. The default value is to 1024. We recommend not modifying this value or decreasing it. It may seem like a good idea to reduce this value, so when a dyno is busy, a request can get sent to a less busy dyno. When Heroku re-routes a bounced request, it assumes your entire app is saturated. Each connection gets delayed by 5 seconds, so you’re automatically being penalized 5 seconds per request. You can read more about routing behavior. In addition, when one of your dynos starts bouncing requests, it’s likely due to an increase in load, and all of your dynos will be bouncing requests. Repeatedly bouncing the same request will result in higher error rates for your customers.
An arbitrarily high backlog value allows your dyno to handle a spike in requests. Lowering this value does little to speed up your app and will actively cause more failed requests for your customers. Heroku recommends NOT setting the backlog value and instead using the default value.
Thread safety
Thread-safe code can run across multiple threads without error. However, not all Ruby code is threadsafe, and it can be challenging to determine whether your code and all of the libraries you are using can run across multiple threads.
If you haven’t run your application in a threaded environment such as Sidekiq or Puma before, you can first try using Puma and adding Rack::Lock middleware. This middleware wraps each request in a mutex so that it is effectively run synchronously.
# config/initializers/rack_lock.rb

Rails.application.config.middleware.insert_before 0, Rack::Lock
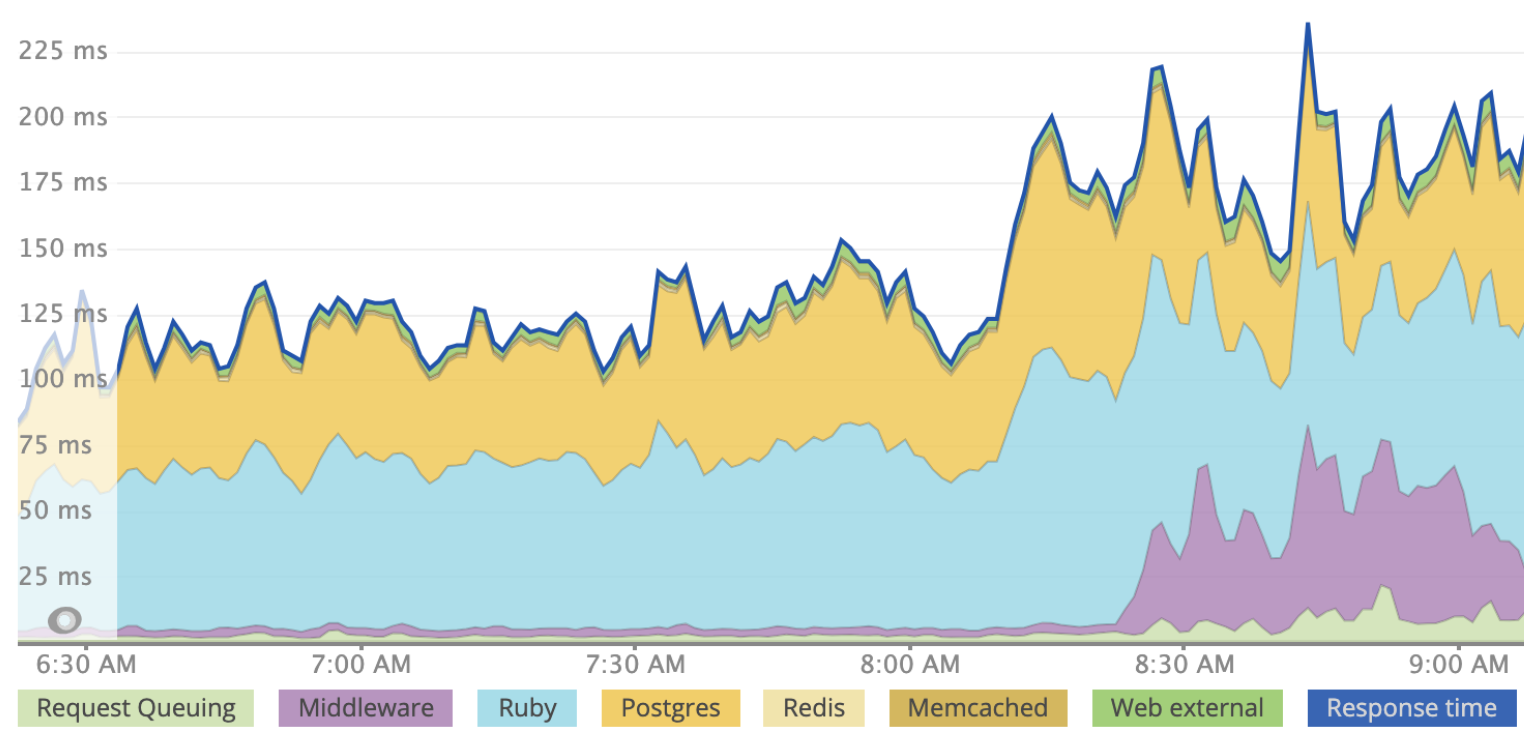
While Rack::Lock will ensure that there are no thread-safety issues with your application, the synchronous nature of the middleware means that your application will respond more slowly than if you are using threads. Here is an example of an application that was deployed to production using multiple workers and three threads per worker. Rack::Lock was introduced for illustrative purposes, slightly before 8:30 pm. You can see the increased request time marked in purple under “middleware”.
While Rack::Lock prevents multiple threads from being utilized, you can still gain concurrency by adding workers. Since a worker runs in a different process and does not share memory, code that is not thread-safe can run across multiple worker processes. However, for maximum resource utilization, we recommend being able to run with both processes and threads.
Thread Safety Tips
If you would like to start using a threaded worker or web server such as Puma, how can you know if your app is threadsafe? Unfortunately, there is no accurate litmus test for thread-safety, but there are some common areas you can look for:
Ensure Thread-safe Dependencies. Make sure all of your gems are threadsafe. Most (if not all) reasonably popular gems that have been released within the past year should be threadsafe.
Don’t mutate globals In general, you want to make sure that you’re not mutating any globally accessible values, for example, if you were using Kernel.const_set in a request, that would affect all requests on all threads and not just the current one. You can get an idea for some other areas that are not thread-safe from this Stack Overflow answer.
Use rack-freeze. This gem prevents you from accidentally mutating your middleware. Rack freeze is different than Rack::Lock and won’t slow down your app. If you’ve written your Rack middleware, it’s easy to introduce a threading bug since each instance touches multiple requests. For example, this middleware is not threadsafe:
# Your Custom middleware that is NOT THREADSAFE
class StatusMessage
  def initialize(app)
    @app = app
  end

  def call(env)
    status, headers, response = @app.call(env)

    if status == 200
      @message = response
    else
      @message = "Bad response"
    end

    # Value of @message could change here,
    # because ivars in middleware are effectively global.
    #
    # If this thread pauses execution here and another thread executes
    # it creates a "race condition".

    [status, headers, @message]
  end
end

# in config/application.rb
config.middleware.use StatusMessage
In this case, @message is global because the same object is used across every response. It can be fixed by using a local variable, message instead of an instance variable @message. If you are using rack-freeze, the gem will call the freeze method on your middleware, so an exception will be raised if any internal state changes. This gem should allow you to catch any thread-safety issues in development before you deploy to production.
Stage and deploy. Once you’re ready to move forward, remove Rack::Lock from your project. You can make sure that it’s gone by running:
$ RAILS_ENV=production rake middleware
First, deploy to a staging app or Review app. Increase your thread count above one. We recommend a default thread count of five per worker, but you may want to start with a lower value and work your way up:
$ Heroku config:set MIN_THREADS=2 RAILS_MAX_THREADS=2
Once you have your application running on staging, have several co-workers access the site simultaneously.
You need to monitor exceptions and look for errors such as deadlock detected (fatal). Concurrency bugs can be challenging to identify and fix, so make sure to test your application thoroughly before deploying to production. If you can make your application thread-safe, the benefit is significant, as scaling out with Puma threads and workers provides more throughput than using workers alone.
Once you are confident that your application behaves as expected, you can deploy to production and increase your thread count.
Recommended default Puma process and thread configuration
Regardless of what we recommend here, you must tune the values to your application. If your application encounters R14 - Memory Quota Exceeded errors, you should consider reducing your process count.
Cedar-Generation Apps
Here are our default recommended values for Puma processes and threads:
| Dyno Type | Recommended web process count (WEB_CONCURRENCY) | Recommended web thread count (RAILS_MAX_THREADS) |
|---|---|---|
| eco | 1 (2 if enough memory) | 3 |
| basic | 1 (2 if enough memory) | 3 |
| standard-1x | 1 (2 if enough memory) | 3 |
| standard-2x | 2 | 3 |
| performance-m | 2 | 3 |
| performance-l | 8 | 3 |
| performance-l-ram | 4 | 3 |
| performance-xl | 8 | 3 |
| performance-2xl | 16 | 3 |
Fir-Generation Apps
We recommend setting the concurrency for Fir dynos to be equal to their vCPU count.
The following material is not comprehensive and is subject to change. For a full understanding of tuning your application’s performance, we recommend The Complete Guide to Rails Performance.
Process count value
Increasing process count increases RAM utilization, which can be a limiting factor. Another factor for setting this value is the number of physical cores on the system. Due to the GVL, the Ruby interpreter (MRI) can only run one thread executing Ruby code at a time. Due to this limitation, to fully make use of multiple cores, your application should have a process count that matches the number of physical cores on the system.
If you go above the physical core count, then the processes will contend for limited resources. Due to this contention, they will spend extra time context switching that could have been spent executing code.
You can find the number of vCPUs on your dyno by running nproc on a system via heroku run bash. For example:
$ heroku run bash --size=performance-l
$ nproc
8
The value returned by nproc includes “hyperthreads” in addition to physical cores; the combination of these two is referred to as the vCPU count. All physical cores used on Heroku have a hyperthread so to gain the “true” number of physical cores divide by two. For example, with performance-l dynos, there are four physical cores and four hyperthreads. This dyno can only physically execute instructions from four processes at a time.
The value for nproc from eco, basic, standard-1x, and standard-2x dynos are correct, but these cores are shared between multiple applications running in containers. While nproc for these dynos will all return 8, it is best to assume only one process can execute at a time.
While the number of physical cores dictates the maximum number of processes that can execute at a given time, there are cases where you want to tune the process count above the physical core count. Multiple processes can provide redundancy in case one process crashes. When a Puma worker process crashes, it will be restarted, but this process is not instantaneous. While the master process is replacing a worker process, having redundancy can mean that the second process can still process requests. For this reason, we typically recommend a minimum of 2 processes, if possible.
The other reason to have multiple processes that exceed physical core count is if your application is not thread-safe and cannot run multiple threads. If you are only running one process in this scenario, then your core will be idle while your application makes IO calls, such as network requests or database queries. In this scenario, having an extra process would allow it to work on another request while waiting on IO.
The final consideration when setting process type is memory use. Scaling out through processes typically uses more memory than using more threads. For more information on this, see: what is a thread. If your application is using so much memory that it starts to swap to disk, this will dramatically reduce the performance of your application. We highly recommend tuning your process count so that your application does not encounter a R14 - Memory Quota Exceeded error.
Thread count value
Once you’ve found an optimal value for your process count, you can further tune the system’s thread count. Threads in a Ruby (MRI) process allow your app to work on multiple requests at a time when there is IO involved (database calls, network calls, etc.). It is “cheaper” for an operating system to context switch between threads, and they also generally consume less memory overall than processes since they share memory. Adding more threads to a system will increase the overall memory use of the Ruby app over time, but it’s not usually the main concern for tuning the thread number.
We recommend the same number of threads for each process type. We picked three because Rails uses this as its default.
Dyno load to tune thread counts (on Performance dynos) - Heroku does provide a Dyno Load metric to understand CPU utilization. Ideally, when tuning overall thread count (number of processes multiplied by the number of threads), you want to consume all CPU time available to your application. The load value in this metric represents the number of tasks/threads that are waiting or currently executing at a given time. If this number is high, it indicates there are too many threads spawned and that your application may be suffering from contention. If the number very infrequently rises above your physical core count, then your application may benefit from additional threads.
For more information, see What is an acceptable amount of Dyno load?
Sample code
The open-source CodeTriage project uses Puma, and you can see the Puma config file in the repo